Tis the season!

Amazingly, this is a tutorial for something that isn't crocheted! It's time to decorate and spread some cheer! Here is my take on a Christmas wreath. And the supplies for this was all bought at Wal-Mart. You can make it with different colors and themes but below is a list of the supplies that I used. If you'd like to download a printable copy of this tutorial, click here.
What you will need:
- Plaid 10 count Spouncer Value Pack (sponge brushes that are 3 each of the 1 ¼ in and ¼ in and 4 each of the the ¾ in sizes. (craft department)
- Apple Barrel Gloss Acrylic Paint in white. This is also found in the craft department.
- Folk Art 491 Metallic Christmas Green & 493 Metallic Bright Red acrylic paint. (Both of these are found in the craft department.)
- Red bird on twigs. (Christmas department)
- Red poinsettia flower with clip. (Christmas department)
- Box of 18 shatterproof ornaments (Christmas department)
- Box of 20 glitter snowflakes (Christmas department)
- Wooden letter for your initial (craft department)
- Basic wreath without any embellishments (Christmas department)
- Small amount of dark green yarn (craft department)
- Yarn needle (craft department)
- Ornament wire hooks (Christmas department)
- White thread (craft department)
- Fishing line (Sporting Goods department)
1 eye hook (hardware department)

The first thing you're going to do is use your white paint and largest sponge brush to paint your wooden letter white. Once it's dry, put on a second coat.

Take your red bird and cut the twine hanger off of him. Also, twist the little metal gold hanger loop off of him.
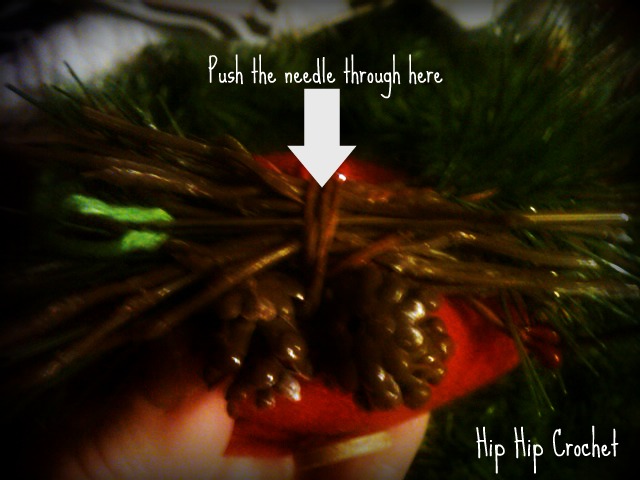
With the needle and yarn, push the needle through one side of the string that is wrapped around the twigs that the bird is sitting on. Once the needle is through the other side, remove the needle leaving the yarn in place. (In other words, don't pull the yarn all the way through.)
Now place the bird at the bottom curve of the wreath and tie it securely to the wreath with the yarn.

Take the clip on poinsettia and place it somewhere near the top. (this is how I made mine but you are more than welcome to place it where you'd like.
Now, at this point your wooden letter should be dry enough to paint your polka dots on. (if not you can come back to this part later.) I used different sizes of the sponge brushes to paint on my dots. Be creative and have fun with this! I found by twisting the brush slightly before I pulled the sponge away from the letter gave it a better finish. I also had to use the edge of the sponge to smooth any not so smooth places in the dots.

While your polka dots are drying, take your white thread and snowflakes and arrange them where you'd like. Secure them by tying them on with the thread.

Take a wire ornament hanger and attach it to one of the ball ornaments. Place the ball, hanger side against the wreath and wrap the long end of the hanger firmly around the wreath. Try to get it wrapped around the base of the wreath and not one of the sprigs. Do this for each ball ornament that you want to use. You can use the picture at the top of this page for placement ideas or go with your own creativity. To help my ornaments to not fall to one side or the other, I put a dot of glue from the hot glue gun on them and stuck them together.
Now place all of your other embellishments except for your wooden letter where you'd like for them to be placed. I also used a few favorite ornaments from my childhood.
Once your wooden letter is completely dry, take an eye hook and carefully screw it into the top of the wooden letter. Take about 6 inches of the fishing line through the eye of the screw and then tie it at the top of your wreath.
Hang and enjoy!
This is the way I made my wreath. I was inspired by one that my friend, Brittany Ross, made and wanted to share with you all how I made mine.


Comments
Post a Comment